AUTODESK REVIT MOST IMPORTANT TIPS AND SHORTCUTS
Autodesk Revit is a building information modelling software for architects, landscape architects, structural engineers, mechanical, electrical, and plumbing (MEP) engineers, designers and contractors. The original software was developed by Charles River Software, founded in 1997, renamed Revit Technology Corporation in 2000, and acquired by Autodesk in 2002.
The software allows users to design a building and structure and its components in 3D, annotate the model with 2D drafting elements, and access building information from the building model's database. But, a tool is only as good as its user, and the full power of Revit can only be unleashed with a better understanding of its various functions.
1. PINNING
Pinned objects will show a thumbtack when selected. Clicking the thumbtack will unpin the object.
If you are referencing or overlaying an external dwg, rvt, or other types of drawings files, make sure they are pinned down to ensure that these reference files do not shift and cause inaccuracies in modeling. You can pin objects by selecting the pin object icon under the Modify Tab, or by typing PN while object is selected. Pinned objects can also be set to not select or highlight when the cursor highlights over the pinned object. This is helpful when an extremely large external Revit model is linked to the working Revit model.
Revit tries to visually highlight any elements that your cursor hovers over, and may take up some processing time when highlighting an extremely detailed element. Simply toggle the “Select Pinned Element” button at the bottom right corner of your Revit model to disabled, and your pinned element will no longer be selectable. Toggle it back on when you need to make adjustments to the pinned element.
Pinned objects will show a thumbtack when selected. Clicking the thumbtack will unpin the object.
2. UNDERSTANDING SHEETS & VIEWS
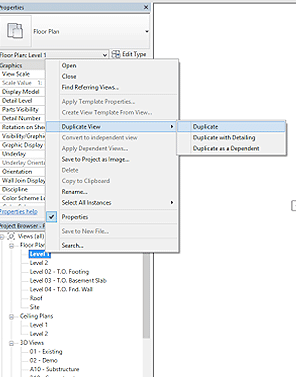
Sheets are used for printing, while views are actual workspaces that can be placed onto sheets for printing. A view can only be placed on one sheet, and cannot be used in multiple sheets at one time. In order to have a similar view placed in multiple sheets, you must duplicate the Views as Dependents and place the new view onto the sheet:
Here is a break down of the differences within duplicating a view:
Duplicate View
Duplicates a view, and all objects that are considered part of the “model”. Things that are detail items, such as detail lines, hatches, text annotations, and detail groups will now show up in the new Duplicated View. Any new changes to the views won’t affect the other.
Duplicate View with Detailing
Duplicates a view with all model items and detail items. Any new changes to either the old or new view won’t affect the other.
Duplicate as Dependent
Duplicates a view exactly as seen. Any changes in one view will affect the other.
When building models, there are often times that changes to a model require one to shift multiple objects at once. Constraining certain elements of a model can aid in adjustments quickly. Simply dimension two elements you want constrained and input the dimension you want to lock in. In the example below, I want the center of the door to always be 2 feet away from the wall to the right. Lock in the dimension string and the object is now constrained. If you want the object to remain constrained but to not show any dimension strings, simply delete the dimension string and click “OK” on the alert message. Clicking “Unconstrain” will remove the constraint along with the dimension string. Now, every time the right wall shifts, the door will shift along with it to maintain the 2 feet distance.

*Note: Over-constraining elements will cause the model to create error messages, which will require you to remove certain constraints.

4. USE SPLASH SCREEN
Sometimes when experiencing a hard time opening a project, make it easier by utilizing a splash screen. Go to Manage tab >> Manage Project panel >> Starting View Tool. The default view to be opened is the Last Viewed. You can change this to a set view. To improve the boot up of Revit, create a new view or choose an existing view that does not display a lot of detail. This reduces the processing time of the Revit file and lets you start working on the project much more quickly.
5. USING FILTERS TO FIND OBJECTS

Often times, you may need to find a specific object in the model, or select multiple of a similar object in the model. Use the Filter function to your advantage. Drag Select a region that will select all the elements you wish to select. Click the Filter button under the Modify Tab and uncheck all irrelevant objects. Click OK and the objects that were left checked will be selected.
This trick is especially useful in locating imported CAD Drawings that did not import to a correct scale. Simply type ZE to Frame all objects in the model space within the window and select all objects in the view. Filter and only check the box for the externally referenced CAD File. Click OK and your imported CAD File will be highlighted. Usually a line with a Pin will indicate the location of the CAD file. Zoom in closer and you’ll find an underscaled CAD plan that you can rescale.
6. OVERRIDE GRAPHICS IN VIEW
If you want a temporary override of line weights or surface texture in a view, simply click the element, click “Override Graphics in View”, then also click “By Element”. This is useful when overlaying CAD drawings to a floor plan view to draft as a reference. When linking CAD files with different colored layers, it may be visually difficult to draft over these drawings. Override projection lines to a dull gray or even a single easily recognizable color to differentiate what a CAD drawing is and what a Revit model is.
Note: Override Graphics only works on the view in which it was turned on in. If you want to change an element throughout the Revit model, change the Visibility Settings instead. Additionally, be aware as to what elements are being overridden. All overrides take precedence over visibility settings, so you will need to turn off the override to have it take on the Visibility Setting’s characteristics again.
7. SNAPPING
Control where your line ends with greater precision by using the snap function. Often times, there will be lines that do not meet at corners, or over-extend due to the default auto-snap that Revit uses. When clicking certain points, input snap shortcuts such as SE (Snap to Endpoint), SI (Snap to Intersection), SP (Snap to Perpendicular), SN (Snap to Nearest), SM (Snap to Midpoint), before clicking the point to have it snap precisely to the point you need it to be in.
If you are working in an area where a lot of linework is occurring, it is best to use the snapping feature and the TAB key to cycle through the available snap points in the area that your cursor is hovering over. Revit will indicate which lines are being used as references to the snap by highlighting the lines.
8. ROOM AREAS VS AREA
It is important to differentiate between Room Area tags and Area tags.
- Use Area tags to calculate overall footage of a building, or areas that are not distinguished as a “space”.
- Utilize Room Area tags when defining rooms, such as any space enclosed by walls.
Use the walls to frame the area, and use Room Separation lines to divide spaces with openings. Do NOT use Area to calculate areas of rooms, as it will not populate in room schedules correctly.

9. PICK LINES
If you are converting line work from a CAD file, instead of drawing the lines individually, you can use “Pick Lines” to automatically copy the CAD lines onto Revit. If the line is drawn as a Polyline in CAD, you can press “Tab” while hovering over the line to potentially select an entire Polyline versus a single segment.
There is the possibility that you can convert an entire CAD drawing into Revit linework by exploding the imported CAD file, but this is not recommended for drawings containing large amounts of linework, 3D elements, hatches, etc. By choosing Pick Line and hovering over a specific line and tabbing through the selections, you can draw single Polylines from existing CAD drawings quickly.
10. UNDERSTANDING FAMILIES & TYPES
Knowing when to create new Families and when to create new Types can make a world of a difference to how long Revit modeling will take. You can view Families and Types to that of animal kingdoms. Families are similar to a species of Animal (Dog, Cat, Parrot, etc.) and there are specific Family Types (Mammals, Amphibians, etc.). Types are similar to the breed of an animal (Golden Retriever, Chihuahua, Bulldog). If you are going to model an object that will change in dimensions, or have certain elements that are visible and not visible in certain instances, then this should be differentiated by Type. If the Family is going to be two completely different models (i.e. a model of a table & a model of a chair), they should be two different Furniture Families.
Families are broken down into certain sub-categories of Families.

Within these sub-categories rests individual Families. I.E. Basic Wall Family.

Within an individual Family rests Types, which are different configurations of a Family. i.e. Brick on CMU is a Family Type within a basic wall Family.

Example: If I need a box in Revit with the dimensions (2’x2’, 4’x4’, and 8’x8’), simply make a Family with a rectangular extrusion. Set the Length, Width, and Height as dimension parameters in the Family. Load the Family into the model and create 3 different Types. Within the Type settings, input the necessary dimensions and click “OK”. Create another Family Type by clicking “Duplicate” and renaming the Type to something else.
Revit Shortcuts
A
AA Align
AL Align
AP Group Objects
AS Align
C
CC Copy
CS Create Similar
D
DD Align Dimension
DE Delete
DI Dimension
DL Detail Line
DM Mirror From Drawn Line
DR Door
E
EL Spot Elevation
G
GP Group
L
LC Link CAD
LI Align
LR Line Model
M
MA Match Type Properties
MI Mirror
MM Mirror From Axis
MN Manage Link
MV Move
O
OF Offset
P
PB Project Browser
PI Align
PN Pin
R
RE Scale
RG Remove Object from Group
RM Room
RO Rotate
RP Reference Plane
S
SA Select All Instances
SC Snap Center
SE Snap End
SI Snap Intersection
SL Splits an Element
SM Snap Middle
SN Snap Nearest
SP Snap Perpendicular
SS Splice
T
TG Tag
TR Trim
TX Text
U
UG Ungroup
UP Unpin
V
VG Adjust Visibility Graphics
VP View Properties
VV View Manager
W
WA Wall
WN Window
Z
ZE Zoom Extents
ZO Zoom Out
ZX Zoom to Fit
ZZ Zoom in Region
TO KNOW MORE IMPORTANT TIPS AND SHORTCUTS CLICK BELOW


VEHICLES