 |
New to Revit roof modelling? Are you striving to create the perfect roof in Revit?
This post gives you the answers to the most common roof problems that beginners face with Revit.
You can also watch the video tutorial below if you prefer.
REVIT ROOF
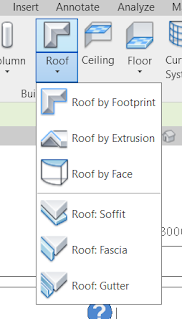
Roof creation methods:
- Roof by Footprint ---> Creates a Roof by selecting building boundaries
- Roof by Extrusion ---> Creates a Roof Extruding profile
- Roof by Face ---> Creates a Roof by using non vertical face of a mass
- Roof : Soffit
- Roof : Fascia
- Roof : Gutter

FLAT ROOF
Do you want to create a flat roof?
Go to Roof tab under the Architecture option bar, Click Roof by Footprint. Then make sure Defines Slope is deactivated before drawing the boundary.
If you want overhang, then enter the required overhang dimension in the next tab.
 |
| Roof by Footprint |
 |
| Defines Slope settings |
SLOPED ROOF
Do you want to create a flat roof?
Go to Roof tab under the Architecture option bar, Click Roof by Footprint. Then make sure Defines Slope is activated before drawing the boundary. If slope is active for boundary lines, a triangle symbol will appear next to them.
To create a hip roof (4-side slope), define slope for all boundaries. To create a gable roof (2-side slope), remove slope for half the boundaries.
For overhang, enter the required overhang dimension in the next tab.
 |
| Sloped Roof |
TO MODIFY ROOF SLOPE
Want to change the slope angle, click on a roof and change the angle in the Slope Properties as shown in the image below.
 |
| Modify Roof Slope |
For irregular slope, you have to edit the roof boundary and change the slope for each individual boundary line.
FLAT ROOF SLOPE
If you want to create some slopes in your flat roof. Then you should need to know the shape editing. Shape editing tools are used to create flat roof slope. First of all you have to select flat roof, then only shape editing tools will appear. Now add points or pick lines to create the desired slope.
ROOF OVERHANG
For overhang, adjust the boundary lines to get the overhang or pick the boundary line and enter the value in option bar as shown below.
 |
| Roof Overhang |
ROOF OPENINGS
If you want to create openings in your roof? Use Vertical opening, or By Face if you want the opening to be perpendicular to roof slope.
 |
| Revit roof openings |
ROOF WITH DORMER
To create a dormer, First of all you have to draw walls over roof level and then create sloped roof over the newly drawn walls. Then use Join / Unjoin Roof tool: This tool is located in the Modify tab. Use it to extend the dormer roof to the main roof.
 |
| Revit Roof Dormer |
 To create a Dormer Opening, Go to the Architecture tab, then click dormer under opening ribbon to create a dormer shaped hole in the main roof.
 Select the main roof, then click on dormer walls and roof. Click the green check to complete the opening. That's all.
Check below video tutorial for the Dormer creation.
Please comment your suggestion or tips for better use of Revit.😊😊

